This article will cover essential React Native APIs and external packages used to create an authentication flow in your app, keeping your authentication mechanisms in-house, and therefore private to external services, while maintaining security. We will cover APIs on both the React Native side and a Node JS server side, providing sample scripts along the way.
Prelude: Is OAuth demand falling?
In-house authentication has taken somewhat of a back seat in recent years, with many apps only opting for “Sign in with X” services based on the OAuth open standard, a protocol allowing services (often tech giants like Google and Facebook) to authenticate a user on an app’s behalf. There are benefits of doing this — less upkeep of your app in terms of data storage and security obligations on the developer end, and an arguably streamlined process not having to input your email address / phone number and management of another password on the user end.
However, privacy concerns are now leading many users to move away from these OAuth based authentication services, a movement partly due to the raised awareness of how user data is being processed by these companies, most notably being run through sophisticated analytics systems and traded with other entities to create a big picture of individual user behaviour. Collecting timestamps and location data in conjunction with the services you log into, combined with your viewing habits (and purchasing habits) is extremely useful for targeted advertising. The issue here lies in the fact that users are often not aware of how this data is being used, and that only big players can access and benefit from this big-data market.
In light of these issues, consumer vigilance has been promoting features like password managers (or keychain access on an Apple device), auto-completion with data stored only on device, and ultimately a more streamlined approach for designing authentication, often only having 2 input fields on the sign in and registration screens. Not only this, mobile apps typically persist a login session indefinitely, as opposed to a website where cookies expire (rightfully so) after a period of time, resulting in the authentication experience being rarely revisited after the initial sign-in. Innovations on the hardware side such as Touch & FaceID make accessing passwords frictionless, removing some of that initial frustration that spurred on the “Sign in with X” culture we’ve witnessed over the years.
We’ve even seen Apple’s privacy centric Sign in with Apple service rollout, but a lack of interest has resulted in poor adoption. The service would have alleviated privacy concerns for big services such as the aforementioned Facebook or Google, but of course it is extremely unlikely they’d give up a data source and adopt a competitor service. For smaller apps, adopting the service does not make sense either. With the tools developers now have to keep authentication in-house, and just the infrastructure in general apps already have set up, there is little need, nor demand, for third parties to facilitate privacy centric authentication.
So what does an authentication flow of React Native look like in 2019? Let’s explore the flow itself and major APIs used, before diving into some code.
React Native Authentication Flow
Let’s talk best practices when it comes to app authentication flow next, discovering the challenges that arise when attempting to integrate seamless authentication.
Authentication Tokens
App authentication is built around a random identifier called an authentication token, that we will refer to as authToken throughout this piece. Once an authentication token is obtained — via successfully signing in — it can be used to upon subsequent app visits to make authenticated API requests.
An authentication token is generated on the server side often in the form of a random hash. A popular method to do this is via the built-in NodeJS crypto package. Using the package’s randomBytes function and formatting it as a string is all that is needed to generate a token:
// generate an auth tokenconst authToken = crypto.randomBytes(64).toString('base64');A newly generated authToken can then be sent back to the device in an encrypted response body.
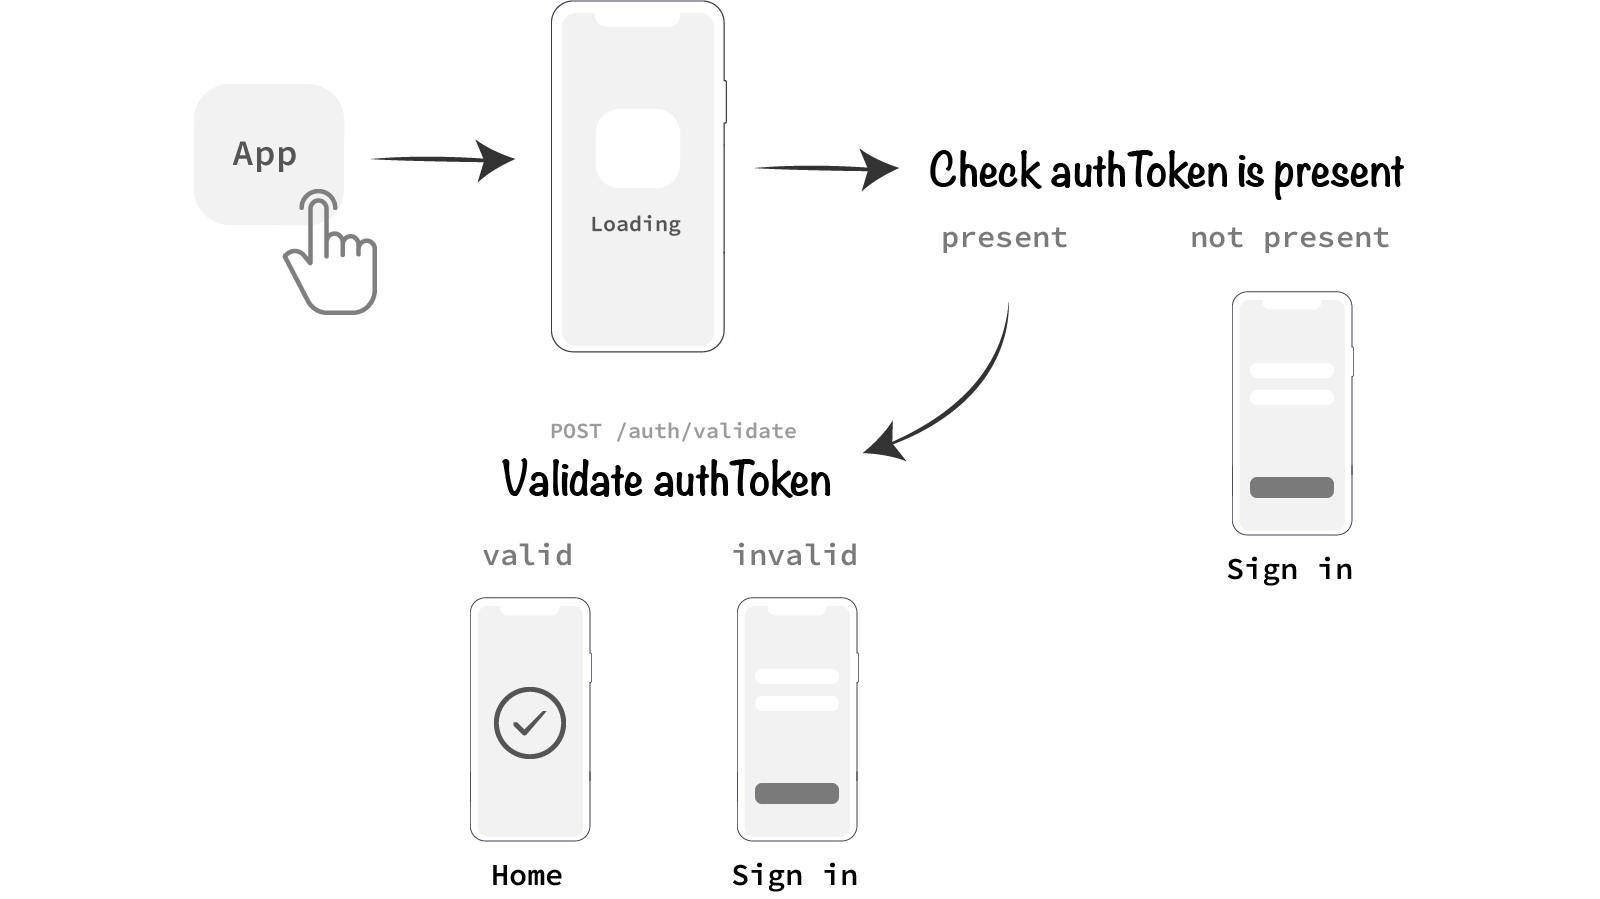
If an authToken is already present and saved on the device in question (the method of which we will visit further down, pertaining to React Native’s AsyncStorage API) then your app can check if it is valid upon the app firing up:
This piece assumes that react-navigation is being used as the app screen navigator.
As you can see from the above illustration, the splash page of an app is a very useful place to carry out initial authentication checks, the result of which determining the next screen to navigate to. If the authToken validation fails the app falls back to the SignIn screen, otherwise will navigate to the Home / default signed-in screen of your app.
But there is a problem with the authentication flow proposed above —in the scenario a device is not connected to the internet, it becomes impossible to validate the authToken. Let’s expand the authentication flow to accommodate offline app usage.
Authentication Metadata for offline usage
Authentication tokens can be combined with other metadata to facilitate additional functionality around your authentication flow. Here are a couple of useful pieces of metadata:
- A timestamp for determining when a user last authenticated (and hence when an
authTokenis generated) - Another random, cryptographically sound identifier to determine the device that is authenticating
By combining both these pieces of data, we can accommodate offline usage of an app in a more secure manner than never checking an authToken.
Authentication Timestamp
With a timestamp returned and persisted in the app along with the authToken, it becomes possible for the app to check if the authToken is still valid after a period of time; 30 days for example. This gives the app 30 days of possible offline usage before the authToken is validated once again, or even automatically renewed if you have a threshold in place.
More advanced authentication flows could check authToken validity within a set window of time before the authToken validation is due, perhaps between day 24–30 in the above case. Within this time period, the app could take it upon itself to validate the authToken if opened while the device is connected to the internet. This is opportunistic design that compliments app experience while maintaining some security.
Device ID to uniquely identify a sign-in device
So where does the Device ID come into play? Well, another unique identifier for the device that attempted to authenticate gives us another layer of security to determine if an authentication is legitimate. If a user attempts to sign in to an app a few times given the same Device ID, then we can assume that the same device is being used and the user is having trouble remembering their password.
If on the other hand no Device ID is given, a human (or a program) could be attempting to sign in from any other device left purely to our speculation. Yes — we have IP address data sent through every API request, but this is of little help with the nature of mobile usage where users continuously connect to different networks, VPNs and WiFi access points.
We need a more concrete means of identifying whether a particular device is being used, and let the user know if sign in attempts are being made from other devices.
For a deviceId, the uuid package can be used with React Native to generate another secure random ID:
// generating a random identifier for `deviceId`const uuidv1 = require('uuid/v1'); // timestamp based
const deviceId = uuidv4();// ⇨ '2c5ea4c0-4067-11e9-8bad-9b1deb4d3b7d'
A deviceId can be generated upon app initialisation, and sent to the server along with an authentication request at any time. If the authentication is successful:
deviceIdcan be persisted in a backend database and tested against with furtherauthTokenvalidationsdeviceIdcan be saved in-app and referenced when making additionalauthTokenvalidations
Our original authentication flow illustration can now be amended to reflect these additional considerations:
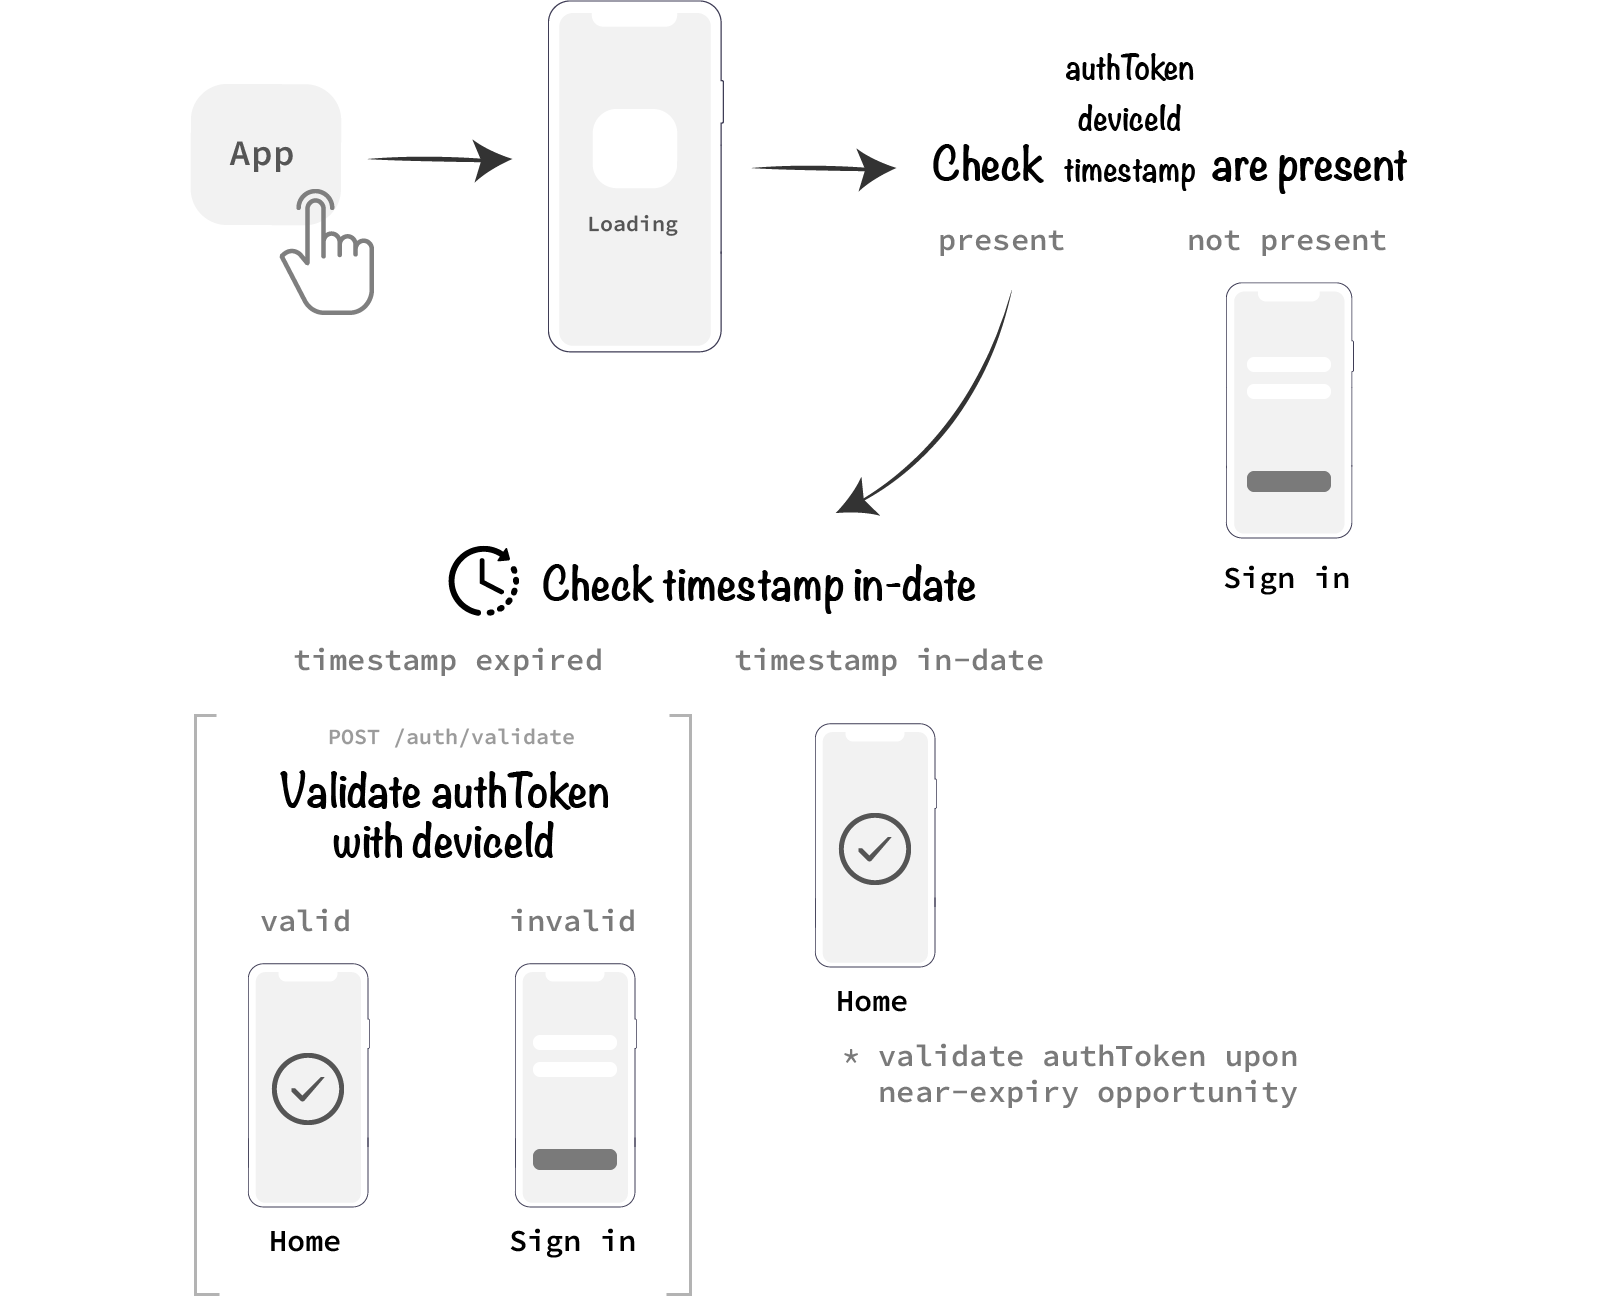
authToken, timestamp and deviceId will all need to be persisted on the device. The simplest way to do so is with React Native’s AsyncStorage API.
Persisting Authentication Data with AsyncStorage
React Native provides a simple solution for persisting data in-app with their AsyncStorage API. As the name suggests, the AsyncStorage methods are asynchronous, meaning they need to be executed in asynchronous functions and not directly within lifecycle methods.
The API has quite a few methods, ranging from simple getting and setting values, to multi-getting and setting, merging stringified JSON objects and even clearing the entire storage completely.
For our authentication needs, the basic functions are all that are required:
import { AsyncStorage } from 'react-native'asyncStorageExamples = async () => {  // getting an item
  const val = await AsyncStorage.getItem('key');  // storing a string
  const a = 'string_val';
  await AsyncStorage.setItem('key', a);  // storing a stringified object
  const b = { b: 1 };
  await AsyncStorage.setItem('key', JSON.stringify(b);  // removing an item
  await AsyncStorage.removeItem('key');
}
So let’s see what this looks like in a practical use cases.
Retrieving authentication data to populate user settings
When an app splash screen loads up, we will firstly need to check whether an authToken exists in storage. Instead of storing the token as a standalone string value, it is more efficient to store all our authentication data as a stringified JSON object:
// structure of authentication object stored in AsyncStorageinterface AuthenticationData {
  authToken: string;
  deviceId: string;
  timestamp: number;
}
If this data exists, then we can either jump straight to the app’s Home screen, or request more information from the server to populate the app with user data:https://rossbulat.medium.com/media/2beb2d0dbc2f5cefbead2c238c6c7cc8
Breaking down this snippet:
initAuthToken()is an asynchronous function that is called as soon as the component mounts, incomponentDidMount- Above this statement is a
componentDidUpdateimplementation with a conditional to check whetherthis.props.userSettingsexists. This variable would be derived from a Redux store, that will become vital to this solution further down - Within
initAuthToken(), we immediately check if authentication data exists inAsyncStorageusing theauthentication_datakey. If nothing exists at all,nullwill be returned JSON.parse()is used to parse our auth data JSON string. A fetch request is made to a/users/populate-settingsendpoint, sending theauthTokenanddeviceIdin the request body- Upon a successful response, another method,
populateUserSettings(), is called. This method will be a Redux dispatch method, whereby user settings returned from the server will be persisted in global state
Notice how we did not send the timestamp to the server here. There is no need, as it would have been persisted in the database upon the user initially authenticating.
- The Redux dispatch method will now trigger a component re-render. Upon this happening,
componentDidUpdatewill be triggered. Now with user settings populated in global state, we will navigate to the appHomescreen. - If no authentication data exists to begin with, we simple navigate to the
SignInscreen. The same applies if the fetch request returns a failure.
We have also set up local state for a failed fetch request. If authentication data does exist, but the fetch request catches, then this suggests something wrong with connecting to the API — perhaps no internet connection, or an unexpected scenario occurs. Setting up local component state to flag this error will allow prompts for the user to retry, or to simply notify them that they must be connected to the internet to use the app.
We should have all bases covered in this example.
This example breaks an offline mode designed app. To bypass this fetch request in the future, user settings can also be stored in AsyncStorage.
Signing in and persisting authentication state
In this next scenario, the user is signing in from a SignIn screen. We contact the server upon a sign in submission, and upon a successful sign in, the authentication data is returned:https://rossbulat.medium.com/media/96611a9238422e4a6a0b9902bc256c9b
- For demonstration purposes, a
deviceIdis generated upon a sign in submission here. A better place would be when your app is initialising and stored inAsyncStorage - Upon a successful sign in, the response data is sent to
handleSignIn()and stringified intoAsyncStorage. If any errors occurred along the way, local state is set in order to flag the user via UI - Once the authentication data is persisted in
AsyncStorage, we call asetSignIn()Redux dispatch method to make our authentication data globally available. HavingauthTokenin your Redux store will bypass having to continuously refer toAsyncStorageevery time you make an authenticated API request - Like the previous example,
componentDidUpdate()will progress the user onto theHomescreen once authentication data has been persisted in state
As you can see, integrating AsyncStorage into authentication flows is quite simple. Remember that only strings are supported in AsyncStorage; it is good practice to stringify your JSON to expand what can be stored.
AsyncStorage is not the only means of persisting data — we also have SQL Lite support, with the react-native-sqllite-storage package. Although the full power of SQL will be at your disposal, this will add complexity and additional boilerplate into your app. Use only when AsyncStorage is no longer adequate for your data storage needs.
A note on server side authentication
Although this piece is focused on the React Native side, it is worth pointing out how authentication happens on the server side. A common method is by utilising the bcrypt package that offers a simple API to hash and compare sensitive credentials.
So if a user registers a new account, bcrypt can then hash the credentials:
// hashing a password with bcryptconst bcrypt = require('bcrypt');
const saltRounds = 10;const hashedPw = await bcrypt.hash(password, saltRounds);
Now upon subsequent sign-ins, a provided password can be compared to the stored hash password:
// validating a passwordconst passwordValid = await bcrypt.compare(req.body.password, hashedPassword);
For an extensive guide on bcrypt, refer to its Github page.
Expanding With Other Authentication Methods
So far we have discussed a fundamental authentication flow, with no additional features such as 2FA or Touch ID.
It turns out that these additional means of security can be built upon the foundation of our authentication system:
- 2FA can be added on top of your authentication flow after you successfully authenticate. Instead of immediately sending back your
authToken, your server will be listening to the 2FA API, whether than be Google Authenticator, or your own service for inputting a code sent through email or SMS. Once your server receives the additional credential, it can send back your authentication data. This works best under a Websocket connection for real-time server to app communication - Fingerprint sensors are on device only, and as a result will not disrupt your authentication flow. Touch ID, Face ID and other such APIs can be enabled after you authenticate, often prompted once the user signs in, and toggle-able in app settings.
Other considerations
Keep in mind that authToken and timestamp should not last forever. Consider introducing some safeguards to your app security:
- Have your server delete the
authTokenandtimestampif a particulardeviceIdfails to validate theauthTokenafter a period of time. This suggests an inactive user; shutting off access until they sign in again will limit unneeded security risks - Have a limit to how many devices a user can sign into. Utilise
deviceIdto prevent too many devices being used concurrently - Refresh an
authTokenwhen a user resets their password and keep a record of the event. Do this for alldeviceIds that are currently authenticated
Ultimately, authentication should be a seamless experience. Having these additional security mechanisms in place will boost security behind the scenes while being imperceptible to the end user.
In Summary
Fundamental mobile app authentication flow pertaining to React Native has been covered in this piece, and how to integrate it into your apps with tools like AsyncStorage, react-redux, react-navigation, and communication to the server-side using simple fetch requests. Adding additional verification steps such as 2FA can be built on top of this foundation, holding back authToken until more credentials are supplied.
We’ve also covered the concept of per-device authentication with unique deviceId identifiers, and how to utilise them to boost security further, as well as the implications of authentication timestamps and how they can facilitate offline app usage.
This piece has also aimed to justify and reintroduce in-house authentication for React Native apps. With the simple APIs and tools present in the React and broader Javascript community, there is a lesser need to rely on third party authentication providers that often lead to a sacrifice in privacy.